Since part of my daily job is related to maintaining the Packstack codebase, I routinely run OpenStack installations every day… in a single VM, in my laptop, just to delete them a couple hours later. But sometimes I need to test some script or code over a live OpenStack installation, and I’d like to have a more stable environment to play with. Sure, there are public environments like TryStack, but I had a couple old laptops lying around, so why not play with them?
So the plan for today is to take these two laptops, install RDO on them, and have them be part of my home network, so that instances can connect to the Internet and get packages from the official repositories, and I can connect to them from my laptop using a floating IP in the same IP range as my home network.
The environment
My test environment is quite simple, I will create an OpenStack environment with one controller and one compute node. Both will be connected to my home network using a single network card.
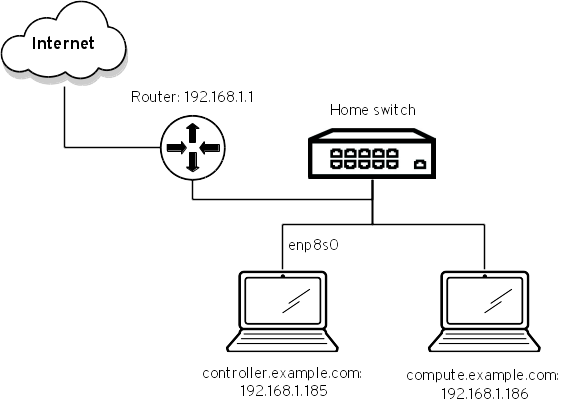
- The controller node has a dual-core Intel Core2 Duo CPU, 4 GB of RAM, and two hard disks, each 160 GB.
- The compute node is more powerful, and it has a dual-core Intel i7-3520M CPU, 8 GB of RAM and a 320 GB hard disk.
Both systems have been set up with a minimal CentOS 7 installation with the latest updates.
Pre-installation tasks
Base OS pre-requisites
We need to get some operating system configuration on both the controller and compute nodes, before going on:
- Make sure NTP is installed. It can be done during the CentOS installation, but if you forgot to do it, you can do so by running the following commands:
# yum -y install chrony
# systemctl enable chronyd
# systemctl start chronyd
- Disable NetworkManager. While this may not be needed anymore, I ran into some issues with my networking setup, so let’s go ahead and disable it for now:
# systemctl disable NetworkManager
# systemctl enable network
# reboot
Set up RDO repositories
As a first step, let’s set up the RDO repository in the controller node. We will use Packstack to install our environment, and it will take care of enabling the required repos in the compute node.
# yum -y install https://www.rdoproject.org/repos/rdo-release.rpm
# yum -y update
This will setup the current RDO version (Liberty as of this writing). We run yum update after setting up the repository because there may be some packages in the RDO repo that override existing packages in CentOS. One such example is python-cffi, which will create issues if it is not up to date.
Create cinder-volumes volume group
The default Packstack setup uses LVM as a Cinder backend, which is enough for our lab purposes. However, it will create an LVM volume group called cinder-volumes on a loopback device if it is not there, so let’s use the second disk on the controller node for this.
# pvcreate /dev/sdb
# vgcreate cinder-volumes /dev/sdb
Installing
Create and edit the Packstack answer file
With all pre-requisites ready, we can install packstack and generate an answer file. We will not be using an all in one setup, instead we will create a custom answer file for our two-node environment
# yum -y install openstack-packstack
# packstack --gen-answer-file=answers.txt
# vim answers.txt
We will change the following variables from their default values:
CONFIG_HEAT_INSTALL=y
CONFIG_LBAAS_INSTALL=y
CONFIG_COMPUTE_HOSTS=192.168.1.186
...
CONFIG_NEUTRON_L3_EXT_BRIDGE=provider
CONFIG_NEUTRON_ML2_TYPE_DRIVERS=vxlan,local,flat
CONFIG_NEUTRON_OVS_BRIDGE_MAPPINGS=physnet1:br-enp8s0
CONFIG_NEUTRON_OVS_BRIDGE_IFACES=br-enp8s0:enp8s0
CONFIG_PROVISION_DEMO=n
The first two options are self-explanatory: I decided to enable Heat and Neutron Load-Balancer-as-a-Service in my environment. You may want to enable other components, as Sahara or Trove.
About CONFIG_COMPUTE_HOSTS, Packstack will by default populate all host-related variables with the IP of the node it is running on. We want to use a different compute node, so that is why we need to change this variable.
The Neutron options deserve their own explanation, keep on reading.
Proper Neutron setup for the external network
This is where many non-trivial Packstack deployments have issues. Part of the problem is that the default all-in-one Packstack setup creates a simple, working Neutron setup, but one that does not allow you to connect to your external network easily:
- It creates an external network bridge br-ex.
- It creates a Neutron external network called public, associated to the external bridge, using a predefined floating IP range of 172.24.4.224/28, which probably will not match your home network.
So, with the settings specified above, we will do the following:
- We will instruct Packstack to set up Neutron to use provider networks, which look scary when reading about them but is basically the best way to define external networks.
- Packstack will create an OpenvSwitch bridge called br-enp8s0, associated to the controller’s network card called enp8s0 (it may be different in your setup), and associated to a Neutron flat network called physnet1.
- Packstack will not create any demo tenant, as we want to do that later.
This setup will require us to create the external network and tenant manually after the installation, but it will allow us to better understand what is going on.
Running the installation
This is now easy:
# packstack --answer-file=answers.txt
Packstack will ask you for the root password for all systems in your environment, and proceed with the installation. If something goes wrong, all log files will be located at /var/tmp/packstack/latest.
Hint: if you need to troubleshoot a failed environment, use the –debug command-line option. It will produce more more verbose logs
Post-installation steps
Now we need to create the Neutron external network that was not created before, as well as the tenant and user. Run the following commands on the controller node:
# . /root/keystonerc_admin
# neutron net-create public --provider:network_type flat
  --provider:physical_network physnet1 --router:external
# neutron subnet-create --gateway 192.168.1.1 --allocation-pool
  start=192.168.1.190,end=192.168.1.199 --disable-dhcp
  --name public_subnet public 192.168.1.0/24
The above lines have created an external network called public, associated to the physnet1 network that we specified in the Packstack answer file (remember it was bound to an OpenvSwitch bridge connected to enp8s0), and a subnet for the floating IPs using your home network’s IP range, in this case 192.168.1.0/24. Note we are using a floating IP pool of 10 addresses, between 192.168.1.190 and 192.168.1.199, and it may be different in your case.
# openstack project create test
# openstack user create --project test --password-prompt --enable testuser
These lines create a test tenant, and a user called testuser in that tenant. The last command will prompt you for a password. Once that is done, you are ready to log on as your test user in the OpenStack dashboard:

Once you are there, you just need to define your tenant network, upload an image to Glance, and launch your first instance, which will then have access to your home network (and the Internet). Since this post is becoming too long, we will discuss this in a follow-up post.

Could you please show how to remove these errors. Every thing else is working fine.
Error: Unable to retrieve network quota information.
Error: Unable to retrieve volume limit information.
regards
Fayaz.
LikeLike
Hi Fayaz,
The “volume limit information” error is a known Cinder issue, due to missing support for Keystone v2. The upstream bug is https://bugs.launchpad.net/cinder/+bug/1517043 . The fix is already in stable/liberty, but it has not made its way to an official build yet.
You can get updated Cinder packages from the RDO Trunk repos (http://trunk.rdoproject.org), just install the following packages:
http://trunk.rdoproject.org/centos7-liberty/current/openstack-cinder-7.0.2-0.20160317181220.8849263.el7.centos.noarch.rpm
http://trunk.rdoproject.org/centos7-liberty/current/python-cinder-7.0.2-0.20160317181220.8849263.el7.centos.noarch.rpm
and restart the Cinder services.
I haven’t seen the network quota issue before, does it show in a specific place in the dashboard?
Javier
LikeLike
The above links do not exist:
Do you thing these two instead will solve the problem:
http://trunk.rdoproject.org/centos7-liberty/current/openstack-cinder-7.0.2-0.20160323090108.3c28bdf.el7.centos.src.rpm
http://trunk.rdoproject.org/centos7-liberty/current/openstack-cinder-7.0.2-0.20160323090108.3c28bdf.el7.centos.noarch.rpm
regards,
LikeLike
Hi Fayaz,
Yes, the links change as new commits are added upstream. So, from the latest centos-liberty directory, install openstack-cinder and python-cinder (not the src.rpm package, it just includes the sources).
LikeLike
Can not open console
Failed to connect to server (code: 1006)
Your input is appreciated !
LikeLike
That error code means there is some issue accessing your hypervisor to get the VNC console for your instance. You’ll probably need to dig inside the nova logs (check both your controller and compute nodes) to find the root cause. I have found some good pointers at https://ask.openstack.org/en/question/520/vnc-console-in-dashboard-fails-to-connect-ot-server-code-1006/, this can be a good start for troubleshooting.
LikeLike
The vnc failed to load problem can be solved as:
…………………………………………………………………….
On compute node do this !
[root@compute /]# nano /etc/nova/nova.conf
search for [vnc] and after [vnc] add or edit and uncoment the following lines
where 192.168.1.185 is your conroller node and 192.168.1.186 is your compute node
……….
[vnc]
novncproxy_base_url=http://192.168.1.185:6080/vnc_auto.html
vncserver_listen=0.0.0.0
vncserver_proxyclient_address=192.168.1.186
..
[workarounds]
XXXXXXXXXXXXXXXXXXXXXXXXXXXXXXXXXXXXXXXXXXXXXXXXXXXXXXXXXXXXXXXXXXXXXXXXXXXXXXXX
On controller node do this !
[root@compute ~]# nano /etc/nova/nova.conf
search for [vnc] and after [vnc] add or edit and uncoment the following lines
where 192.168.1.185 is your conroller node and 192.168.1.186 is your compute node
……….
[vnc]
novncproxy_base_url=http://192.168.1.185:6080/vnc_auto.html
vncserver_listen=0.0.0.0
vncserver_proxyclient_address=192.168.1.186
..
[workarounds]
xxxxxxxxxxxxxxxxxxxxxxxxxxxxxxxxxxxxxxxxxxxxxxxxxxxxxxxxxxxxxxxxxxxxxxxxxxxxxxx
Restart both nodes to take effect of changes, shutdown -r now
LikeLike
Hi Jpena,
Do you know a simple method to build my own OpenStack images in wcow2 format. Thanks in advance !
LikeLike
Hi Fayaz,
Usually you will start from one of the distribution-provided qcow2 images. http://docs.openstack.org/image-guide/obtain-images.html has a comprehensive list of places were you can get them from. Then, follow the steps described in http://docs.openstack.org/image-guide/modify-images.html to modify the image to suit your needs.
You can also create your own image from scratch, if you need to (http://docs.openstack.org/image-guide/create-images-manually.html), although I would only recommend you to do it if you have very specific requirements.
LikeLike
Please guide, can I install the latest version of openstack Mitaka in the same way ?
LikeLike
Yes, it should work the same way. You’ll probably see some differences in the Horizon UI, but that’s it.
LikeLike
What if I have to use three nodes (Computer, Controller and Network) for Openstack installation;
The following commands need to be run on my Network node OR Controller node? Please explain !
——————————————————————————————————
# . /root/keystonerc_admin
# neutron net-create public –provider:network_type flat
–provider:physical_network physnet1 –router:external
# neutron subnet-create –gateway 192.168.1.1 –allocation-pool
start=192.168.1.190,end=192.168.1.199 –disable-dhcp
–name public_subnet public 192.168.1.0/24
————————————————————————————————–
regards,
LikeLike
Hi Javier,
Thanks for the great tutorial!
I’ve set it up on a new CentOS 7 server and after installation it worked fine.
Howerver, after a reboot, the bridge interface doesn’t get an IP address (it is configured to use DHCP).
I have to go to the server console and perform a “systemctl restart network”. Then it is getting its IP and everything works fine until the next reboot.
I also tried to give it a static IP, but then the server cannot reach neither the internet nor the router (the default route points to the router). But it can reach other hosts on my private network.
Do you have any ideas?
Best regards,
Stephan
LikeLike
Hi Stephan,
Which RDO version are you running? I think I’ve seen some cases where that happens, but usually restarting network was not enough, and some additional change was needed. Maybe it’s an obvious question, but have you enabled the network service (and disabled NetworkManager)?
LikeLike
Hi Javier,
Thanks for the quick reply.
I’m using the CentOS Newton release as describe here:
https://www.rdoproject.org/install/quickstart/
I deactivated firewall and NetworkManager as described and enabled network service.
Regards,
Stephan
LikeLike
Mmmm, that’s strange. Can you share your ifcfg files to check what’s wrong? As an example, these are the files from my working environment (based on RDO newton, with static IPs):
# cat ifcfg-br-enp2s0
DEFROUTE=”yes”
UUID=”cdc080ab-3792-4765-9d1e-ca579b3b407f”
ONBOOT=”yes”
IPADDR=”192.168.1.223″
PREFIX=”24″
GATEWAY=”192.168.1.1″
DOMAIN=”example.com”
DEVICE=br-enp2s0
NAME=br-enp2s0
DEVICETYPE=ovs
OVSBOOTPROTO=”none”
TYPE=OVSBridge
# cat ifcfg-enp2s0
DEVICE=enp2s0
NAME=enp2s0
DEVICETYPE=ovs
TYPE=OVSPort
OVS_BRIDGE=br-enp2s0
ONBOOT=yes
BOOTPROTO=none
LikeLike
Here ist my interface setup:
# cat /etc/sysconfig/network-scripts/ifcfg-br-enp2s0f1
DEFROUTE=yes
PEERDNS=yes
DNS1=8.8.8.8
PEERROUTES=yes
UUID=1a7fcd46-df28-4708-8b88-3f7b320f0c83
ONBOOT=yes
DEVICE=br-enp2s0f1
NAME=br-enp2s0f1
DEVICETYPE=ovs
OVSBOOTPROTO=dhcp
TYPE=OVSBridge
OVSDHCPINTERFACES=enp2s0f1
OVS_EXTRA=”set bridge br-enp2s0f1 other-config:hwaddr=00:25:b3:e2:48:00″
# cat /etc/sysconfig/network-scripts/ifcfg-enp2s0f1
DEVICE=enp2s0f1
NAME=enp2s0f1
DEVICETYPE=ovs
TYPE=OVSPort
OVS_BRIDGE=br-enp2s0f1
ONBOOT=yes
BOOTPROTO=none
I’ll try it once more with a static IP by mirroring your setup.
Thanks,
Stephan
LikeLike